Patterns
|
Shop Note: I am working on getting my patterns from Etsy uploaded to this website so everyone can enjoy them, but it is slow going.
You are free to use these patterns for your personal use or for charity. You are also free to sell the items you make, however, these are copyrighted patterns. You can not sell or reproduce the patterns for sale in any format without my written permission from me. I would appreciate it if when you post pictures of your creations online, you'd post a link back to this website or give credit to Yarn Genie Mysteries. If for some reason you can't or you forgot to a credit link, I don't have a fleet of yarn police to investigate, so you're on your honor. If you'd like to donate something small for the use of the patterns, please use the donate button to send me a donation, or just pay it forward and donate to your favorite nonprofit charity. I thank you for your generosity. Celeste |
Your small donation for the use of a pattern is appreciated.
|
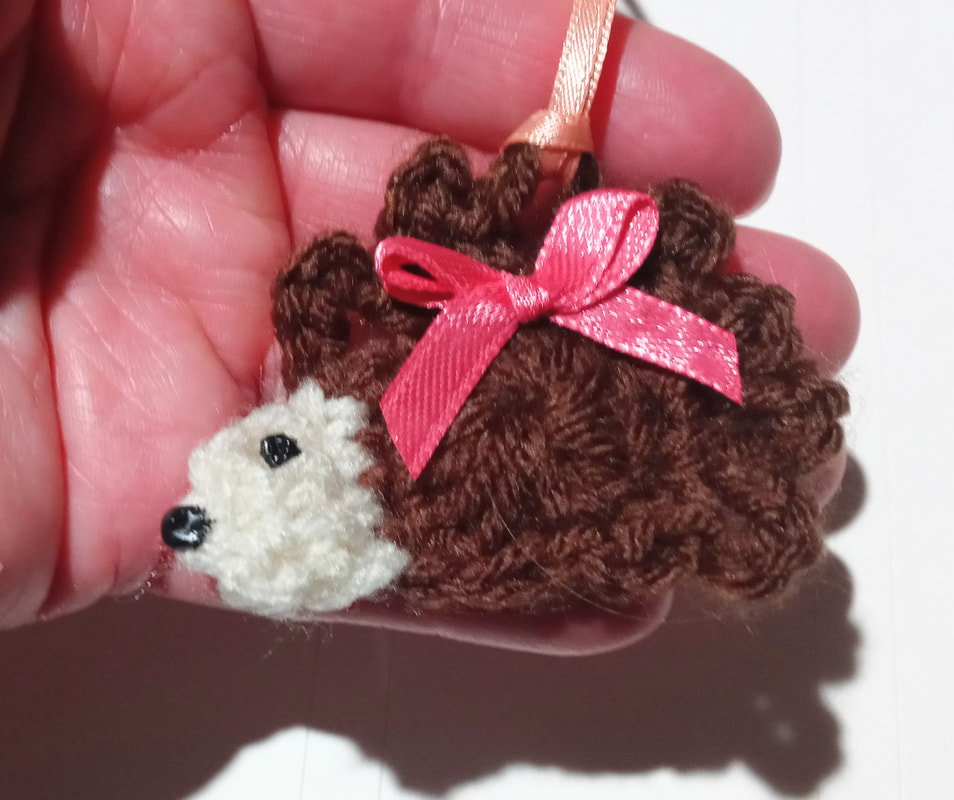
Hedgehog Ornament
|

|
Tuck one of these little guys in a card to give as a quick gift. This is a great stash buster and easily can be sewn on clothing or made into a pin for use other than an ornament.
Supplies Needed:
Size F or 5 crochet hook (3 3/4 mm)
Small amount of worsted weight yarn for body (any color)
Small amount of worsted weight yarn in cream or white for head
Thin ribbon for making a small bow and making the hanging loop
Black puffy fabric paint for nose and eye (or black embroidery floss to make French knot nose and eye)
Yarn needle for weaving in yarn ends
Sewing needle and thread to attach the small bow to the body (or use hot glue)
Instructions:
With body color Chain 3
Round 1: Work 14 double crochet in 3rd chain from hook, join to beginning double crochet with a slip stitch, chain 1
Round 2: (Single crochet in first stitch, chain 5, single crochet in next stitch) do this 6 times. Leave the rest of the stitches unworked and changing to cream color,
Round 3: Chain 2, do a double crochet in each of the next 4 stitches, chain 1
Round 3: Draw up a yarn loop in each of the 4 cream double crochets, yarn over and pull through all loops.
Finish off. Weave in yarn ends.
Make a small bow and sew this on the body (or hot glue it on)
Make a ribbon loop and thread it through one of the upper spines of the body and secure it for hanging as a decoration.
Lip Balm Cozy

Keep your lip balm always handy by clipping it to your backpack, purse, or key chain. Give one with a new tube of Chapstick as a quick and thoughtful gift to a teacher or friend.
Supplies need:
Instructions:
Leave about a 6 inched tail for weaving in later and make a slip not. Put your hook through the opening in the bottom ring or rectangle of the lobster clasp, 5 single crochet around the base of the clasp.
Rows 1-3: single crochet. chain 1, turn. [5 single crochet]
Rows 4-22: single crochet, half double crochet, single crochet, half double crochet, single crochet, chain 1, turn. [5 stitches]
Fold the long strip of your project up over the lip balm tube. The end of you last row should go to the last row of single crochet you did at the beginning with the cap of the tube should be showing so it can be grabbed to remove it for use. If the strip you just crocheted is too long or too short, remove rows as needed. Finish off, leaving a long tail for sewing up the sides, but don't do that just yet. You'll want to sew the button on first because it's easier to sew it on before the sides.
Sew on the button so it will face front when you sew up the sides.
Whip stitch the edges closed and weave in all the yarn ends.
Happy Crocheting!!!
Supplies need:
- Size F or 5 crochet hook (3 3/4 mm)
- Small amount of worsted weight yarn.
- Metal Lobster clasp lanyard.
- Yarn needle
- Decorative button (optional)
Instructions:
Leave about a 6 inched tail for weaving in later and make a slip not. Put your hook through the opening in the bottom ring or rectangle of the lobster clasp, 5 single crochet around the base of the clasp.
Rows 1-3: single crochet. chain 1, turn. [5 single crochet]
Rows 4-22: single crochet, half double crochet, single crochet, half double crochet, single crochet, chain 1, turn. [5 stitches]
Fold the long strip of your project up over the lip balm tube. The end of you last row should go to the last row of single crochet you did at the beginning with the cap of the tube should be showing so it can be grabbed to remove it for use. If the strip you just crocheted is too long or too short, remove rows as needed. Finish off, leaving a long tail for sewing up the sides, but don't do that just yet. You'll want to sew the button on first because it's easier to sew it on before the sides.
Sew on the button so it will face front when you sew up the sides.
Whip stitch the edges closed and weave in all the yarn ends.
Happy Crocheting!!!